Ever wished you could be in two places at once, at least digitally speaking? Remote access to your Raspberry Pi isn't just a luxury; it's the key to unlocking its full potential, transforming it into a truly versatile tool, accessible from anywhere your imagination and internet connection takes you.
In an age where connectivity reigns supreme, the ability to remotely commandeer a Raspberry Pi has evolved from a niche capability to an essential skill. From orchestrating intricate home automation systems to prototyping sophisticated embedded solutions, from enriching educational endeavors to simply expanding personal computing horizons, remote control offers an unparalleled level of flexibility. Whether you're a seasoned coder or a curious beginner, the power to manipulate your Pi's desktop, tinker with its terminal, and manage its files from afar is undeniably compelling. Fortunately, the pathways to achieving this remote mastery are numerous, tailored to accommodate varying levels of technical prowess and diverse application scenarios. The seasoned administrator might opt for the command-line precision of Secure Shell (SSH), while others might prefer the graphical interface provided by Virtual Network Computing (VNC), or perhaps the enhanced security and ease of use offered by cloud-based alternatives.
| Category | Information |
|---|---|
| Name | Paul Mucur |
| Occupation | Web Development at Raspberry Pi |
| Area of Expertise | Web Technologies, Raspberry Pi Ecosystem |
| Contribution | Providing explanations and insights into Raspberry Pi technologies. |
| Website | Official Raspberry Pi Website |
The initial step toward remote enlightenment often involves selecting the right tools. Here, a plethora of options awaits, each with its unique blend of features and ease of use. RealVNC Connect stands out as a particularly popular choice, lauded for its secure and intuitive interface that allows seamless control of your Raspberry Pi from a range of devices, including Windows, macOS, and Linux machines. This effectively liberates your Pi from the confines of physical proximity, allowing you to manage projects, transfer files, and monitor system performance from anywhere in the world. Another noteworthy contender is Raspberry Pi Connect, a free service that offers both screen-sharing and remote shell functionalities. These tools are meticulously designed to cater to both novice and expert users, ensuring that everyone can harness the power of remote access to amplify their Raspberry Pi experience.
- Movierulz Unveiled Is Free Movie Streaming Still King Today
- Is Movierulz Safe Exploring The Risks Of Online Movie Consumption Now
However, with great power comes great responsibility, and in the realm of remote access, security must be paramount. Once you've settled on your preferred method of connection, bolstering its defenses becomes critical. Employing a secure VNC connection fortified with robust encryption is particularly vital when accessing your Pi over the open internet. This shields your sensitive data from prying eyes and unauthorized access attempts. While the convenience of remote control is undeniable, it also introduces potential security vulnerabilities if not properly configured. Therefore, it is crucial to implement robust safeguards to protect your Pi and the valuable data it holds. Understanding the inherent risks and adopting security best practices will ensure that your remote connection remains both useful and secure.
The journey to setting up a remote desktop connection to your Raspberry Pi via VNC typically unfolds in a series of well-defined steps. Initially, you'll need to install and configure a VNC server on your Pi, which will act as the engine for sharing your desktop screen. After the installation, enabling the VNC server is a crucial next step. For those using a Raspberry Pi Zero W, accessing the device's terminal may require the assistance of a USB cable. Once the VNC server is primed and ready, you can establish a connection from another computer using a VNC client. RealVNC provides a complimentary VNC viewer application compatible with Windows, macOS, and Linux. Alternatively, you can explore other remote access methods, such as SSH, and tailor them to function seamlessly within your local network or across the internet. By mastering these fundamental techniques, you're embarking on a path towards complete remote Raspberry Pi control.
When it comes to establishing remote desktop access to your Raspberry Pi via VNC Viewer, two distinct approaches present themselves: direct connection and cloud connection. The optimal choice hinges on your specific needs and the stringency of your security requirements. A direct connection is typically favored when both the Raspberry Pi and the client device reside on the same local network, facilitating a streamlined and efficient connection. In contrast, a cloud connection leverages a secure intermediary server to establish the link, which proves particularly valuable when accessing the Pi over the vast expanse of the internet. Regardless of the chosen method, the overarching objective remains the same: to provide a secure and seamless means of remotely controlling your Raspberry Pi.
- Free Movie Streaming Is Entertainment Without Paywalls Possible
- Streaming Wars Decoding The Evolution Of Movie Tv Consumption
This comprehensive guide will delve into the intricacies of setting up remote access, emphasizing practical steps and real-world application scenarios. Whether you're working with a cutting-edge Raspberry Pi 5 running Bookworm or an older, more seasoned model, you'll find invaluable insights to ensure a smooth and successful remote access configuration. We'll also tackle common troubleshooting issues, such as black screens or performance lag, equipping you with the knowledge to overcome any hurdles that may arise. Through detailed, step-by-step instructions and expert advice, we'll empower you to confidently establish remote access to your Raspberry Pi.
For those new to the Raspberry Pi universe, a foundation in the basics is always the best starting point. The initial setup involves installing the Raspberry Pi OS using the Raspberry Pi Imager tool. Once the operating system is installed, you can proceed to configure your preferred remote access method. For more seasoned users, an existing OS installation and familiarity with the command-line interface (CLI) might already be in place. While the setup process remains largely consistent, a command of the terminal will invariably streamline the process.
Encountering compatibility issues or sluggish performance shouldn't be a cause for alarm. Numerous solutions are readily available. For instance, certain VNC clients might prove incompatible with the default authentication protocol employed by the RealVNC server included with Raspberry Pi OS. In such instances, you might need to adjust the client's settings to utilize a specific encryption or encoding method. Furthermore, experimenting with various settings can help optimize the performance of your remote connection. By preparing yourself to troubleshoot potential problems, you can ensure a seamless and gratifying remote access experience.
Remote access to a Raspberry Pi transcends mere desktop viewing; file transfer is also an indispensable function. RealVNC Viewer, available on Windows, macOS, and Linux, facilitates seamless file transfers between your computer and the Raspberry Pi. This feature allows for effortless file management, enabling you to back up critical documents or exchange data for ongoing projects. The ability to copy and paste files further enhances the remote experience, fostering maximum efficiency.
The ability to connect via a mobile VNC client further enriches the remote access capabilities. Numerous apps, such as VNC Viewer by RealVNC, are available for both iOS and Android, allowing you to control your Raspberry Pi from your smartphone or tablet. This grants you the ultimate in remote command, allowing you to manage your Raspberry Pi from virtually anywhere. The freedom to connect using your phone offers an invaluable degree of flexibility.
Raspberry Pi Connect provides a simplified and secure method for remote screen sharing. This service eliminates the need to manually locate your local IP address, allowing you to access your Raspberry Pi seamlessly through a web browser. This streamlined approach simplifies the setup process, making it particularly appealing for users who seek a straightforward remote access solution. Raspberry Pi Connect is tailored for users who prioritize convenience and ease of use.
The sharing of files between devices is also a core feature of remote access. Local network services, such as NFS (Network File System), SCP (Secure Copy Protocol), Samba, and Rsync, enable file sharing between devices on your local network. By configuring these services, you can effortlessly access and manage your files without directly interacting with the Raspberry Pi itself. This simplifies the process of sharing files with other devices on your network, irrespective of their location.
A common question is: "How does the underlying technology work?" Paul Mucur, who leads web development at Raspberry Pi, offers an insightful explanation. Essentially, the technology relies on VNC, which allows a computer's desktop to be displayed on another computer's screen. While the computers are often located in the same building and connected to the same network, more complex configurations are certainly possible.
Since the inaugural Raspberry Pi debuted in 2012, VNC has been a favored choice for desktop sharing. However, the evolution of the Raspberry Pi ecosystem has spurred the emergence of alternative options that enhance security and user experience. Raspberry Pi Connect exemplifies this trend, offering a new service that enables secure remote access to your Raspberry Pi from any location via a web browser. Raspberry Pi Connect is pre-installed for users with Raspberry Pi 4 or newer models running the latest version of Raspberry Pi OS, simplifying the setup. For those with older models, the package can be downloaded using the apt package manager.
To remotely control your Raspberry Pi from any internet-connected device, explore these options: expose SSH or VNC on your Raspberry Pi over the open internet, within a VPN, or through a service like RealVNC's cloud VNC viewer. Alternatively, consider Raspberry Pi Connect, a free screen-sharing and remote shell service provided by Raspberry Pi. These services offer varied levels of security and complexity, enabling you to select the option that best aligns with your specific needs.
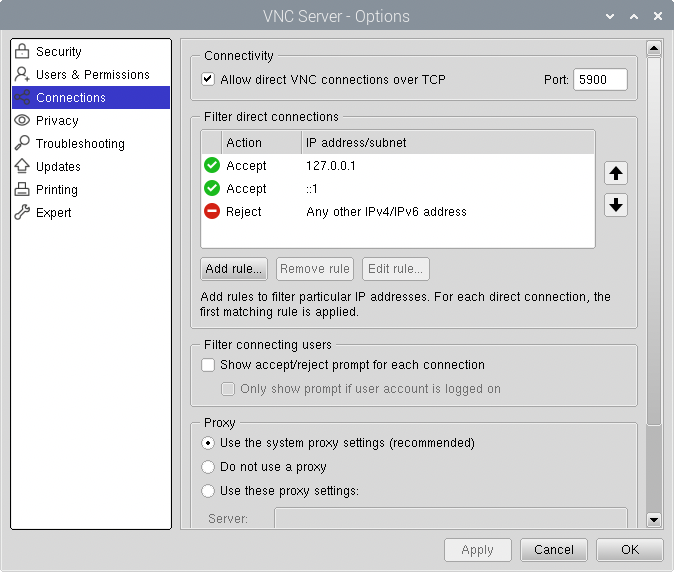
To connect to your Raspberry Pi from another machine via SSH or VNC, knowledge of your Raspberry Pi's IP address is paramount. This is easily accomplished if a display is connected to the Raspberry Pi. However, the IP address can also be obtained remotely from another machine on the network using several methods. If utilizing RealVNC, you may need to set the encryption to 'None' and/or the encoding to 'Raw'. Additionally, ensure that you select the correct VNC server within the configuration menu, if the server offers this feature.
Many users have successfully connected to their Raspberry Pi using VNC. For instance, by following online solutions, you can enable RDP and then use VNC seamlessly. Installing RDP first appears to resolve certain VNC-related issues. Additionally, connecting to your Raspberry Pi via a mobile VNC client on your smartphone is a straightforward process. By adhering to these methods, you can establish a remote connection to your Raspberry Pi from any device.
To install and configure Connect on the Raspberry Pi OS desktop, adhere to these simple steps. If you lack a functioning OS installation, begin by installing the Raspberry Pi OS via the Raspberry Pi Imager. Once the OS is prepared, you can configure Raspberry Pi Connect, bringing you closer to a seamless remote experience.
This guide outlines the setup and use of VNC (Virtual Network Computing) on a Raspberry Pi for remote access, tailored for beginners and hobbyists seeking to remotely access their Raspberry Pi from devices like computers, tablets, or smartphones.
The core concept of VNC is simple: it mirrors and controls your Raspberry Pi's desktop on a different screen.
Whether managing projects, transferring files, or tracking system properties, VNC is a versatile tool that lets you connect to your Raspberry Pi from anywhere.
Key advantages of using VNC for remote access on a Raspberry Pi:
- Accessibility: Access your Raspberry Pi from any device with a VNC client (Windows, macOS, Linux, iOS, Android).
- Simplicity: Easy to set up and use, making it ideal for beginners.
- Versatility: Manage projects, transfer files, and monitor your system remotely.
- Security: Secure connections with encryption, especially when using RealVNC.
These steps will help you set up a VNC server on your Raspberry Pi.
Step 1: Access the Terminal
- If using a graphical desktop on your Raspberry Pi, open a terminal window.
- If headless (no monitor), access the terminal via SSH (Secure Shell).
- Connect to your Raspberry Pi over the local network or public internet.
Step 2: Update Your System
Update your Raspberry Pi's packages. Run these commands in the terminal:
sudo apt updatesudo apt upgrade
Step 3: Install a VNC Server
Multiple VNC server options are available. RealVNC is often pre-installed, but here's how to install it.
sudo apt install realvnc-vnc-server
If RealVNC isn't your preference, install alternatives like TightVNC, which may need specific configuration for best results.
sudo apt install tightvncserver
Step 4: Configure RealVNC (Recommended)
Enable RealVNC through the Raspberry Pi configuration tool.
sudo raspi-config
Go to "Interface Options" > "VNC" and enable.
RealVNC has a cloud connection option for secure, simple access from anywhere.
Step 5: Configure TightVNC (Alternative)
If you use TightVNC, start the VNC server and set a password.
vncserver
You will be asked to set a VNC access password.
vncserver -geometry 1024x768
Starts VNC on display (":1") with 1024x768 resolution. ":1" means the server runs on display 1.
Step 6: Find Your Raspberry Pi's IP Address
To connect, find your Raspberry Pi's IP address.
hostname -I
Shows the IP address of your Raspberry Pi on the network.
Step 7: Connect Using a VNC Client
Download and install a VNC client on your computer or mobile device. RealVNC Viewer works well.
Open the VNC client and enter your Raspberry Pi's IP address, plus the display number (if needed). For example:
192.168.1.100:1
Enter your VNC password when asked.
Troubleshooting:
- Black Screen: Check your VNC server configuration and display number.
- Lag: Change VNC client settings. Lower color depth and use a less bandwidth-intensive encoding method.
- Authentication Issues: Check your VNC password and make sure your VNC server is enabled.
- Network Problems: Ensure your Raspberry Pi is connected to the network, and your firewall allows VNC.
Consider these advanced configurations for better security and functionality.
1. Secure Connections with SSH Tunneling:
Use SSH for a secure connection to forward VNC traffic. This encrypts the data sent between your Raspberry Pi and the client.
From your computer's terminal, run:
ssh -L 5900:localhost:5900 pi@your_raspberry_pi_ip_address
ssh: Start the SSH connection.-L 5900:localhost:5900: Creates a local port forward.pi@your_raspberry_pi_ip_address: Your Raspberry Pi username and IP address.
In your VNC client, connect to localhost:5900.
2. Using a VPN (Virtual Private Network):
A VPN adds security by encrypting all internet traffic between your device and the VPN server.
- Install and set up a VPN client on your Raspberry Pi.
- Connect to the VPN.
- Access your Raspberry Pi by its local IP address within the VPN network.
3. Cloud VNC Connect:
RealVNC provides a cloud service that connects your Raspberry Pi without requiring port forwarding or dynamic DNS.
- Sign up for a RealVNC account.
- Install RealVNC server on your Raspberry Pi and log in to your account.
- Connect to your Raspberry Pi from any device by logging into your RealVNC account.
4. Firewall Configuration:
If you use a firewall, allow traffic on the VNC port (usually 5900).
- Allow incoming connections on port 5900 (or the configured port) on your firewall.
RealVNC Viewer makes it easy to transfer files between your computer and Raspberry Pi. Use these steps:
- Connect to your Raspberry Pi via RealVNC Viewer.
- Find the toolbar button in the RealVNC Viewer app.
- Click the button to open the file transfer dialog, and follow instructions.
Mobile VNC Clients let you remotely control your Raspberry Pi from your phone or tablet.
To connect using a mobile VNC client:
- Install a VNC viewer app on your phone (e.g., RealVNC Viewer).
- Open the VNC app and tap the plus (+) icon to add a new connection.
- Enter your Raspberry Pi's IP address, plus a colon and the display number (e.g., 192.168.1.100:1).
- Enter your VNC password.
- Connect to your Raspberry Pi.
These steps get you set up with VNC remote access.
SSH (Secure Shell) is a secure network protocol that provides a remote terminal for your Raspberry Pi.
The key steps:
- Enable SSH: Enable SSH on your Raspberry Pi through the Raspberry Pi configuration tool (
sudo raspi-config) or by creating an SSH file on the boot partition. - Find the IP address: Find your Raspberry Pi's IP address (e.g., using
hostname -I). - Connect via SSH: Open a terminal on your computer (Windows: PuTTY or WSL; macOS/Linux: terminal) and run:
ssh pi@your_raspberry_pi_ip_address - Enter password: Enter your Raspberry Pi password.
Share files and data between devices connected to your Raspberry Pi using these methods:
- NFS (Network File System): Share directories over a network, making them local to the connecting machine.
- SCP (Secure Copy Protocol): Securely copy files to and from your Raspberry Pi using an SSH connection, encrypting the data.
- Samba: Enable file sharing between Raspberry Pi and Windows machines or other systems that support SMB/CIFS.
- Rsync: Synchronize files efficiently, transferring only differences, for backups and updates.
- Why Kannada Cinema Is Booming Now 2024s Biggest Hits
- Decoding Masa49 Exploring The Meaning Behind This Viral Term